> ## Documentation Index
> Fetch the complete documentation index at: https://itemstores.com/help/llms.txt
> Use this file to discover all available pages before exploring further.
# Participants and points
> Who can access a gated store, and the points they spend there
Participants are the people enrolled in one store. They matter when the store is
gated, when you run a point program, or both.
The page has three tabs, **Participants**, **Codes** and **Settings**, but only
once the store is gated or runs a point program. A store with neither shows the
participant list on its own.
## Adding participants
**New participant** opens a chooser with two tiles. **Email invite** takes one
address, and a starting balance when the store runs points. **Upload CSV** picks
a file and imports it.
The CSV needs an `email` column. A store running points can carry a second
column, `points` or `amount`, and a row without one gets the default balance.
Filter the list by **All**, **Joined** or **Pending**. Each row shows how that
person got in, their balance, and when they joined or were invited.
For setting one up end to end, see
[Run a points store](/help/tutorials/run-a-points-store).
## Codes
Codes do two jobs at once: they let someone into a gated store, and they carry
points. A code works for either on its own, so an open store can still use codes
purely to hand out points.
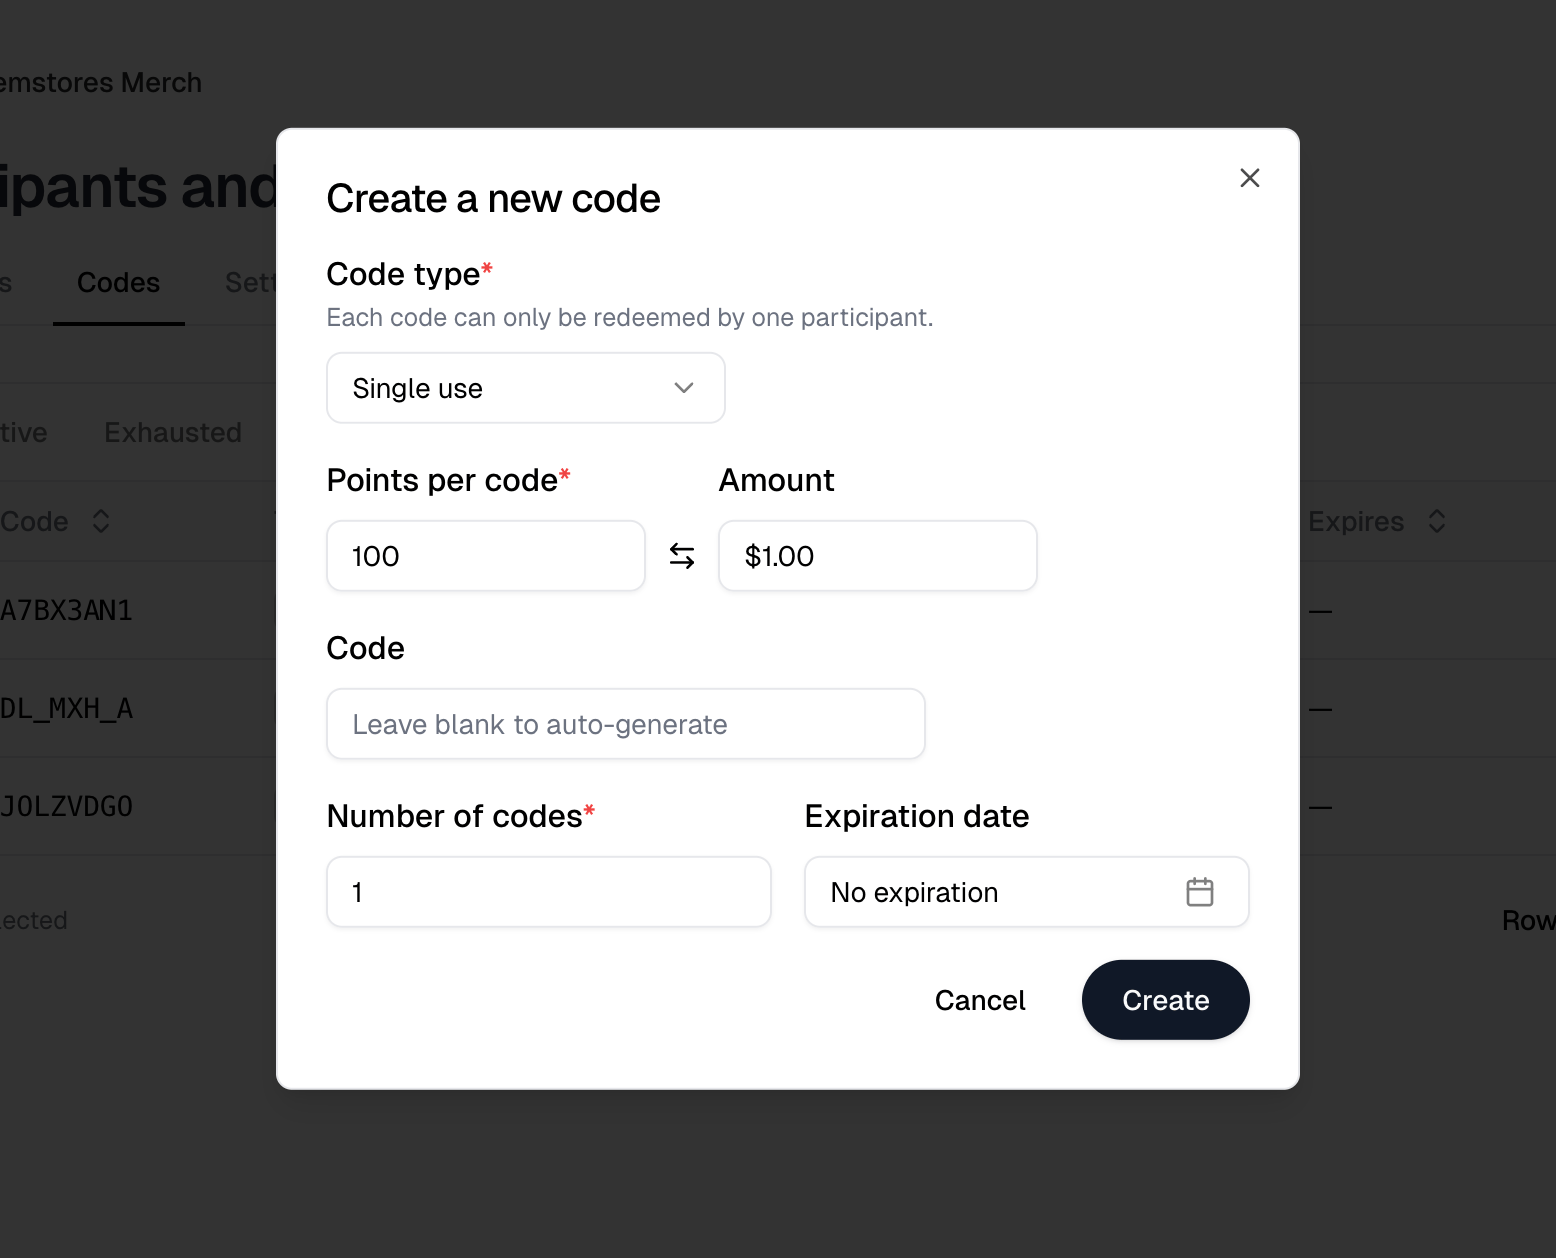
**New code** opens the Create a new code dialog. **Code type** comes first and
decides what the rest of the dialog asks for.
| Setting | What it does |
| --------------- | ------------------------------------------------------------------------------------------ |
| Single use | The code works once. Adds **Number of codes**, so one pass can generate a batch |
| Multi-use | One shared code. Adds **Max uses**, which is unlimited when left blank |
| Code | Your own code instead of a generated one. Offered only when you are creating a single code |
| Points per code | Points granted when the code is redeemed. Only with a point program |
| Expiration date | When the code stops working. Defaults to **No expiration** |
**Create** makes them. The dialog does not send anything. To hand a code out,
use **Share** in its row menu, which gives you a link to copy and a **Send by
email** box that takes several addresses at once.
The **Codes** tab filters by **All**, **Active**, **Exhausted** and **Expired**,
so you can see what is still usable. A row's menu holds **Share**, **Edit** and
**Delete**, and selecting codes reveals a toolbar with **Edit**, **Download CSV**
and **Delete** for several at once.
 ## Points
**Points system**, a switch on the store itself, gives participants a balance to
spend in the store. It sits beside the store settings form, the same place as
**Gated access**.
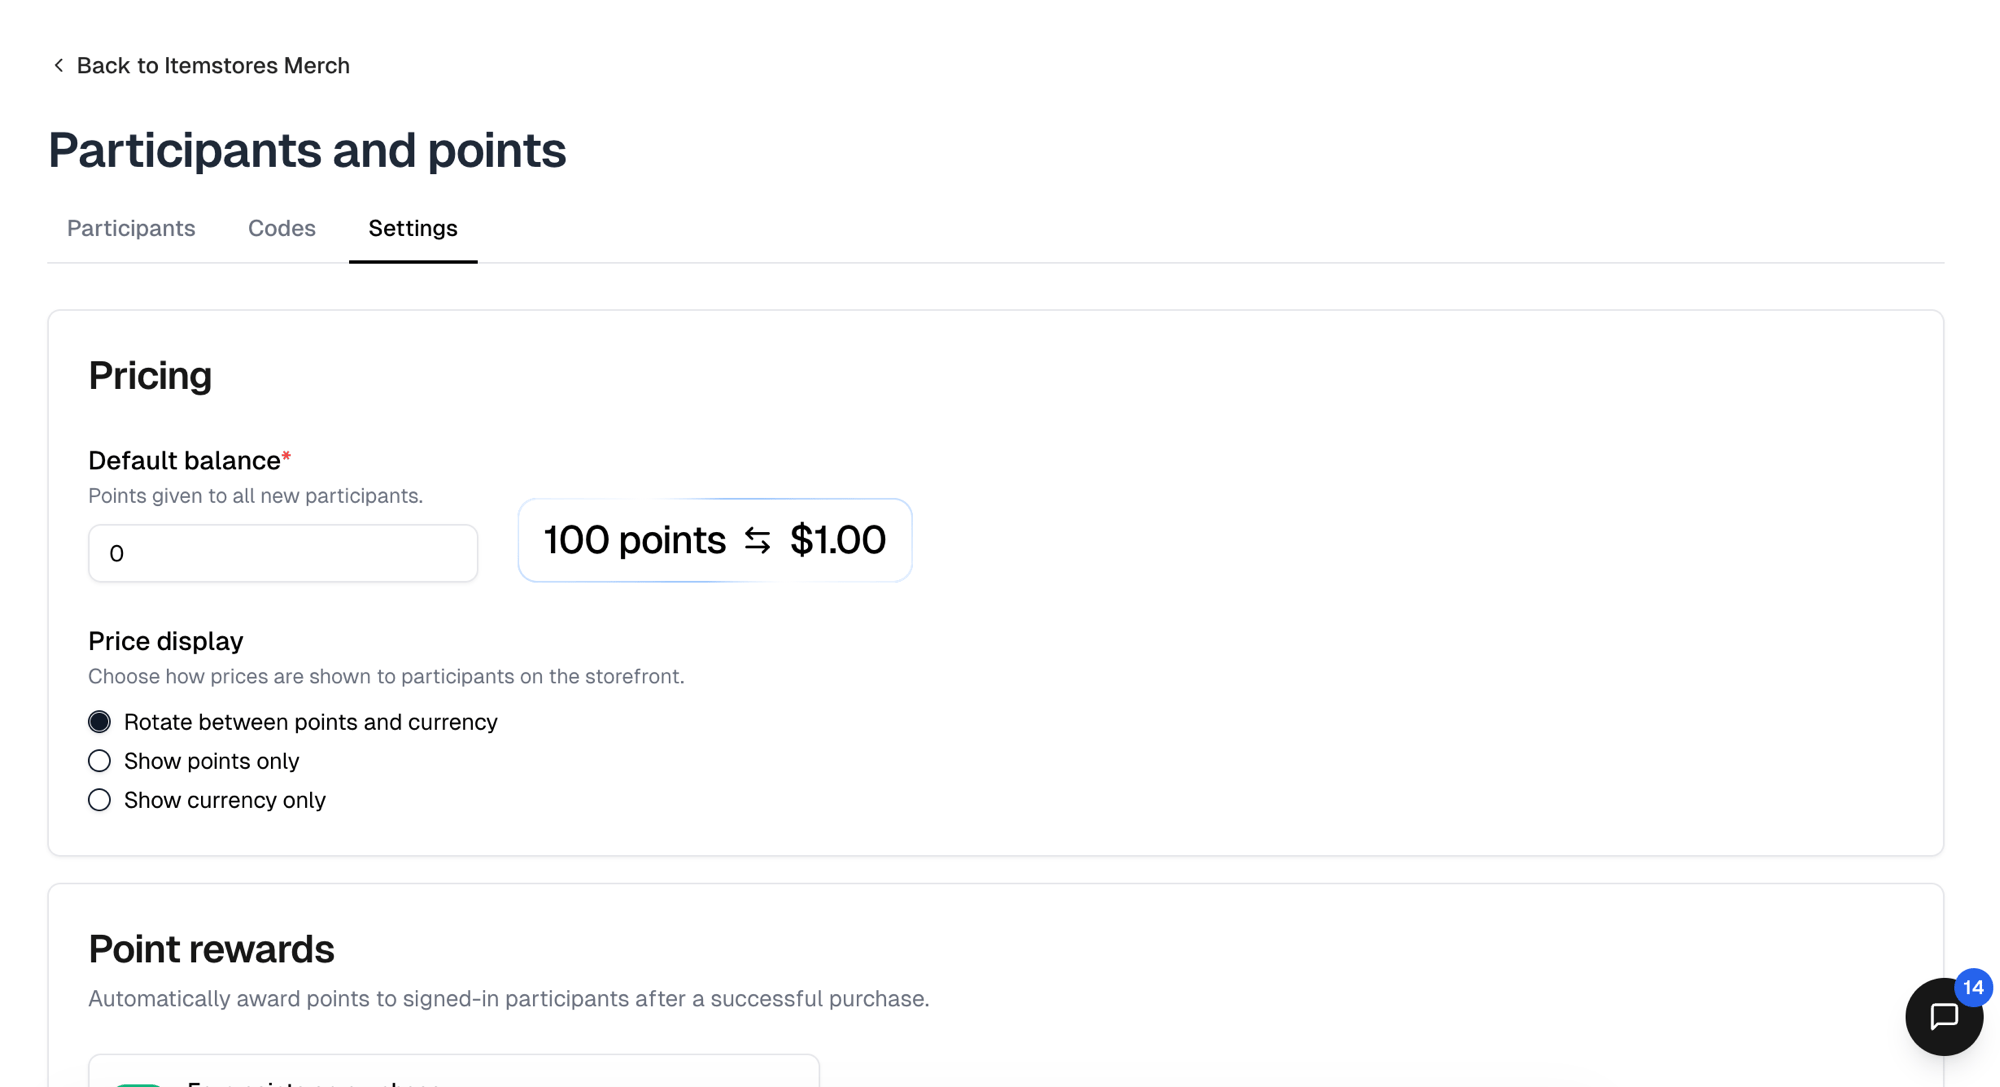
The rate is fixed: 1 point is 1 cent, so 100 points is \$1.00 and a \$20 shirt
costs 2,000 points. The converter beside **Default balance** shows both sides of
whatever you type.
| Setting | What it does |
| --------------- | ------------------------------------------------------------------------------------------------------- |
| Default balance | Points given to all new participants. Starts at 0 |
| Price display | **Rotate between points and currency**, the default, or **Show points only**, or **Show currency only** |
To change one person's balance, use **Adjust balance** in their row's menu. That
dialog takes a **Reason**, which is recorded against the change.
To change several at once, select them, then use **Adjust balance** in the
toolbar that appears. The bulk dialog asks for an **Operation**, either
**Increase by amount**, **Decrease by amount** or **Set new balance**, and the
figure. It has no **Reason** field.
The same toolbar carries **Send email**, **Download CSV** and **Delete**.
**Adjust balance** appears in both places only when the store runs a point
program.
If the store is not gated, anyone can sign up and automatically receive the
default point balance. Either enable gating, or set the default balance to 0.
## Points
**Points system**, a switch on the store itself, gives participants a balance to
spend in the store. It sits beside the store settings form, the same place as
**Gated access**.
The rate is fixed: 1 point is 1 cent, so 100 points is \$1.00 and a \$20 shirt
costs 2,000 points. The converter beside **Default balance** shows both sides of
whatever you type.
| Setting | What it does |
| --------------- | ------------------------------------------------------------------------------------------------------- |
| Default balance | Points given to all new participants. Starts at 0 |
| Price display | **Rotate between points and currency**, the default, or **Show points only**, or **Show currency only** |
To change one person's balance, use **Adjust balance** in their row's menu. That
dialog takes a **Reason**, which is recorded against the change.
To change several at once, select them, then use **Adjust balance** in the
toolbar that appears. The bulk dialog asks for an **Operation**, either
**Increase by amount**, **Decrease by amount** or **Set new balance**, and the
figure. It has no **Reason** field.
The same toolbar carries **Send email**, **Download CSV** and **Delete**.
**Adjust balance** appears in both places only when the store runs a point
program.
If the store is not gated, anyone can sign up and automatically receive the
default point balance. Either enable gating, or set the default balance to 0.
 ## Gated access
**Gated access** is a switch on the store itself, set when you create it or in
the store's settings. It is separate from the point program, and a store can use
either without the other.
A gated store shows **Access restricted** instead of its products. Everyone who
reaches it has to get in one of three ways.
| Route | How it works |
| ---------------- | ------------------------------------------------------------- |
| Email invite | You invite specific addresses |
| Code | They enter a code you gave them |
| Domain allowlist | Anyone with an email on a domain you list can join themselves |
Invites and codes work as soon as the store is gated. The domain allowlist is
the one you turn on, under **Enrollment** on the **Settings** tab.
With an allowlist set, the restricted screen names the allowed domain and offers
**Join by email or code**. Without one, it only asks for a code.
Returning participants use **I already joined** and receive a sign-in link by
email. There is no password.
**Verify identity only** pairs with the allowlist. People who join that way
start at 0 points instead of the default balance, which is what you want when
the allowance is handed out by code.
## Enrollment settings
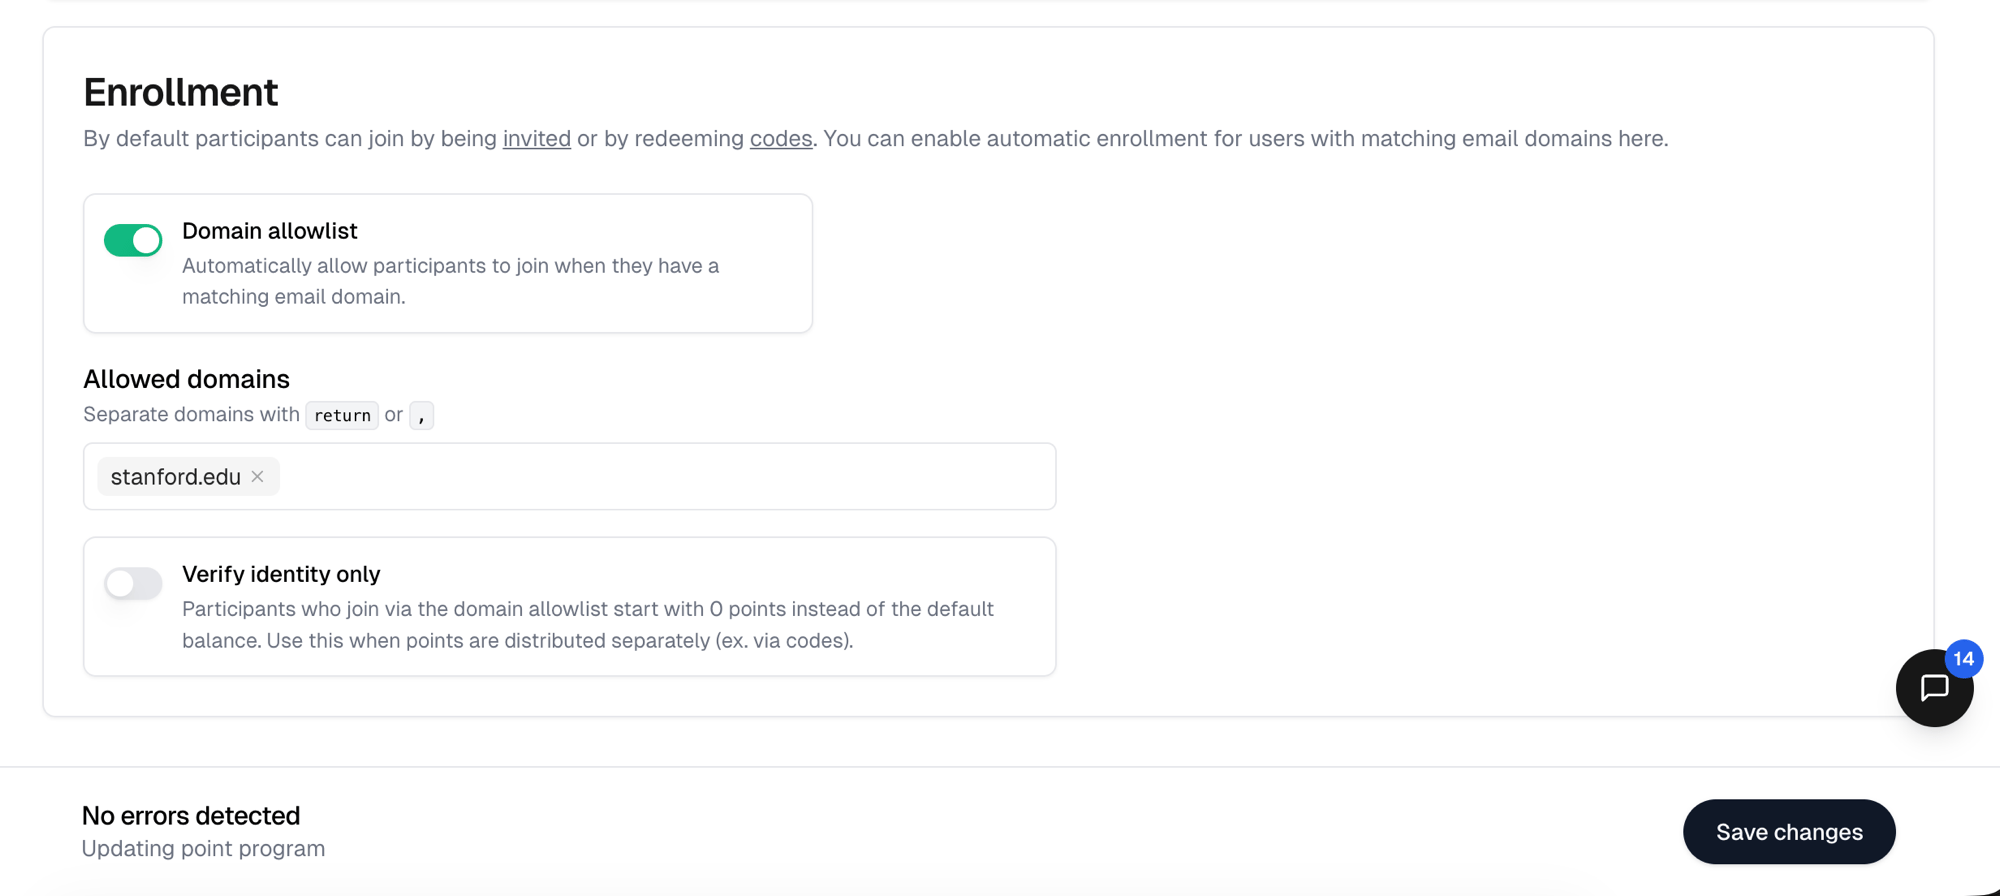
**Enrollment** on the **Settings** tab is where the domain allowlist lives. Turn
on **Domain allowlist**, then enter one or more **Allowed domains**, separated by
a return or a comma. **Verify identity only** sits below them, and only when the
store also runs a point program.
The Settings tab shows only what applies: **Pricing** and **Point rewards** for a
store with a point program, **Enrollment** for a gated one. **Save changes** in
the bar at the bottom writes them.
## Gated access
**Gated access** is a switch on the store itself, set when you create it or in
the store's settings. It is separate from the point program, and a store can use
either without the other.
A gated store shows **Access restricted** instead of its products. Everyone who
reaches it has to get in one of three ways.
| Route | How it works |
| ---------------- | ------------------------------------------------------------- |
| Email invite | You invite specific addresses |
| Code | They enter a code you gave them |
| Domain allowlist | Anyone with an email on a domain you list can join themselves |
Invites and codes work as soon as the store is gated. The domain allowlist is
the one you turn on, under **Enrollment** on the **Settings** tab.
With an allowlist set, the restricted screen names the allowed domain and offers
**Join by email or code**. Without one, it only asks for a code.
Returning participants use **I already joined** and receive a sign-in link by
email. There is no password.
**Verify identity only** pairs with the allowlist. People who join that way
start at 0 points instead of the default balance, which is what you want when
the allowance is handed out by code.
## Enrollment settings
**Enrollment** on the **Settings** tab is where the domain allowlist lives. Turn
on **Domain allowlist**, then enter one or more **Allowed domains**, separated by
a return or a comma. **Verify identity only** sits below them, and only when the
store also runs a point program.
The Settings tab shows only what applies: **Pricing** and **Point rewards** for a
store with a point program, **Enrollment** for a gated one. **Save changes** in
the bar at the bottom writes them.
 ## Earning points on purchase
Participants do not earn points by spending unless you turn it on. **Earn points
on purchase** is off by default, so a new point program only ever hands out the
balances you allocate.
Turn it on and set an **Earn rate**, which is points per cent, not per dollar.
An earn rate of 0.01 is 1 point per \$1.00 spent, and the converter under the
field spells out what a rate is worth.
## Earning points on purchase
Participants do not earn points by spending unless you turn it on. **Earn points
on purchase** is off by default, so a new point program only ever hands out the
balances you allocate.
Turn it on and set an **Earn rate**, which is points per cent, not per dollar.
An earn rate of 0.01 is 1 point per \$1.00 spent, and the converter under the
field spells out what a rate is worth.